Tuesday, February 23, 2010

My Favorite Sandwich


This sandwich has given new meaning to "sandwiches for dinner" in our house.  My mom introduced this sandwich to me(thanks, mom) and now it works its way onto our table about once a month.  This can be a meal in itself, but you might be left a little hungry, so I usually serve it with my Butternut Squash Soup or Minestrone(this recipe is coming next week!!).
Sandwiches are always simple, but this one has a couple "gourmet" ingredients that really take it to a whole other level.  If you know me very well at all you know I love brie cheese.  I mean, I really love it.  If I could only live on one thing for the rest of my life it would be brie.  And maybe a good baguette.  Ok, and some wine.  Really, though, brie is my all time favorite food.  So, brie in a sandwich, slightly melted and oozing a tad-bit is pure heaven!!
My mom said she discovered this recipe on foodnetwork.com and is a Tyler Florence recipe.  I've yet to actually look up the recipe so I have no idea how much of what he calls for, but you really can't mess up a sandwich so I just use what looks good to me!

These are the ingredients you'll need for this recipe:


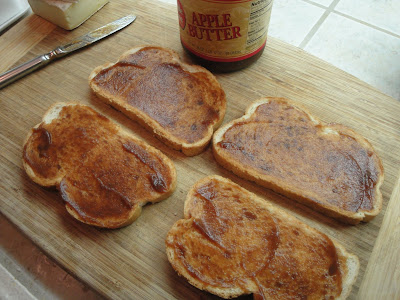
Start by spreading some apple butter on your bread.  You'll want it on both sides, but you can use as much or as little as you like.  The more you spread on, the sweeter it will be. 


Brie cheese.  I could just eat it like this and be happy. 


But I shall resist the temptation and practice some patience.  It will be even better when the sandwich is done, which is only in like, 5 minutes.   Arrange your sliced brie on one slice of bread for each sandwich.


Next up, turkey.  I like to use thinly sliced and only about 3 pieces.  Just a little hint of the turkey.  The star of the sandwich is the brie, after all, and I want it to really have its chance to shine!  You can use any kind of turkey you like.  I think my favorite is honey roasted.


Next up, arugula.  I don't think any substitutions should be made.  Arugula is peppery and bitter and goes quite nicely with the apple butter.


Make sure your arugula makes its way to the middle of your sandwich.  You don't want it to be touching the bread as you want it as far away from the heat source as possible.  There is nothing worse than soggy warm greens in your sandwich.


Butter both sides of the bread.  The more butter, the better.  Isn't this always the case?!?  I try to practice a little restraint, though, and use a somewhat moderate amount.


Grill until golden on both sides.  If you can remember, place the sandwich brie side down first.  It always takes a little longer for the first side to grill and the more time you have with the brie close to the heat source, the better.  The more meltier and oozier.  **I did NOT remember to do that this time**


Yum.  I might have to make this for lunch today..


Grilled Turkey and Brie Sanwiches
Adapted from Tyler Florence

Yield: 2 sandwiches

4 slices sliced french sandwich bread(do not use sourdough, it will overpower the flavors of the sandwich)
1 wedge brie cheese, any kind you like
6 slices thinly sliced turkey
apple butter
arugula
butter

Spread apple butter on the insides of both pieces of bread, for each sandwich.

Place sliced brie on one side of bread.  Place turkey slices on the other.  Top the brie cheese with a small handful of arugula and then put the sandwich together. 

Butter the outsides of both pieces of bread and grill until golden on both sides.  Serve warm.

Enjoy!!


Sunday, February 14, 2010

Key Lime Pie


I have to admit that I did not go out and buy key limes for this recipe.  I picked up about a half dozen of regular old limes at Trader Joe's for this recipe.  I have seen places online where you can order bottles of key lime juice and I always intend to purchase some, but then I forget.  Regular limes work just fine in this recipe, but if you can get your hand on some key limes, by all means DO!  I'm sure there really is a difference in taste.

I tested this recipe once before, but the original crust it called for just didn't do it for me.  This time I used my mom's tried and true recipe for her graham cracker crust.  It really is the best!  I will now use it for all my recipes that call for a graham cracker crust, no doubt about it.

This pie is so, so, so simple!  This is all you will need for this recipe:


Ok, well, actually you will need some heavy whipping cream, powdered sugar and vanilla extract so that you can also make homemade whipped cream to serve on top of your pie.  If you don't already make your own whipped cream, please start now.  It is one of the most simple things you can do in the kitchen and the reward is 100 times more than the effort put in.  Really, no more cans of whipped cream unless your kids are making ice cream sundaes or something, ok?  Your friends and family will thank you.

Before you start juicing your limes, grate some zest.  The amount called for in the recipe, as well as some extra to set aside to make your pie pretty.


Your crust should look like this when it comes out of the oven:


Pour in the filling, and when it comes out of the oven, it should look like this:


Now, cover and refrigerate for at least 2 hours and it is ready to eat!  Of course, after you have prepared your homemade whipped cream...


...and don't forget the lime zest!

Key Lime Pie
Adapted from The Pioneer Woman and my mom


For the filling:
1 heaping TBSP lime zest, plus more for garnish
1/2 cup lime juice
2 egg YOLKS
1 14oz can sweetened condensed milk

For the crust:
24 squares graham crackers
1/4 cup sugar
1/3 cup butter, melted

In the bowl of a food processor slightly break graham cracker squares.  Process until they become crumbs.  Add sugar and melted butter, pulse until combined.

Press graham cracker mixture into the bottom and sides of a 9" pie pan.  Bake in a 350 degree oven for 10 minutes. 

For the filling:
Mix lime zest, lime juice, and egg yolks in a mixing bowl.  Add your condensed milk and mix on high until smooth and thick.  Pour mixture into crust and bake for 15 minutes.

Remove from oven and let cool completely.  Cover and refrigerate for at least an hour or two.

Serve with (homemade) whipped cream and garnish with lime zest.

Enjoy!!

Thursday, February 4, 2010

Pesto, Pasta, and Peas


Who doesn't love pesto, right?!?  My husband.  He doesn't hate it, but definitely thinks it is "chick food."  Whenever I tell him I am making something with pesto in it for dinner I get a long sigh followed by a "pestooooo....??"  much like the whiny "chiiicken...??" I have mentioned before.  I usually just tell him to get over it and be happy that he has a wife that cooks such delicious things and not just casseroles night after night.  But on this night, I said, "Don't worry, I'm taking this to bunco and there is a pizza in the oven for you guys."  I did have him taste test this, though, and surprisingly enough, he liked it.  This coming from the guy that hates pasta salads, too, was especially impressive!  Of course, all the girls at bunco loved it!  After all, it is chick food...

This is what you'll need for this recipe:


I wouldn't categorize this as a healthy recipe, but most of the fat in it is good fat.  I've made it healthier, too, by using multigrain pasta with added protein and canola oil based mayo.  Speaking of which, have you ever compared fat grams between that stuff and Best Foods original?  I'm pretty sure it saves you like 10g of fat per serving.  And I think it tastes great!

While the pasta is cooking, make your sauce:


The sauce consists of the spinach, pesto, mayo, and lemon juice


Toss the cooked pasta in some EVOO along with the pesto mixture, toasted pine nuts and defrosted peas and you've got yourself a delicious and easy pasta salad!


And don't forget the parmesan cheese, please!

Pesto, Pasta, and Peas
Adapted from Ina Garten, The Barefoot Contessa

1 pound fuilli or rotini pasta(I used Barilla Plus rotini)
2 TBSP EVOO
1 cup basil pesto, store bought or homemade
1 10oz package frozen chopped spinach, defrosted and squeezed dry)
1 1/2 TBSP freshly squeezed lemon juice
a little less than 1 cup mayonnaise.
1/2 cup freshly grated parmesan
1 cup frozen peas, defrosted
1/4 cup pine nuts, toasted
kosher salt and pepper to taste

Cook the pasta in a large pot of boiling salted water until al dente.  Drain and toss into a bowl with the olive oil.  Cool to room temperature.

Meanwhile, toast the pine nuts on medium low heat in a small saucepan until they start to brown.  This usually takes 6-8 minutes, but keep your eye on them.  They burn fast!

In the bowl of a food processor fitted with a steel blade, puree the pesto, spinach, and lemon juice.  Add the mayo and puree.  Add the pesto mixture to the cooled pasta and then add the parmesan, peas, pine nuts and salt and pepper to taste.  Serve at room temperature for the best flavor.

Enjoy!