Tuesday, August 17, 2010

Shrimp and Feta Mac and Cheese


This recipe was floating around the blogosphere a few months ago and I happened to have almost all the ingredients on hand so I had to give it a try.  Oh my, so glad I did.  We ate this for days and it was so delicious.  At least everyone but Maddie did.  That girl hates mac and cheese.  Doesn't every kid LOVE mac and cheese?!? 

This is a perfect meal for these cool summer nights we've been having in Sacramento.  Fresh ingredients, but with the comfort of a baked noodle dish. 

This is everything you will need to make this:


I really like to use this frozen shrimp from Costco.  Very affordable and the shrimp are always delicious.  The best thing about frozen shrimp is that you can completely forget to take it out to thaw and as long as you rinse them in some cold water and place in a colander, you will have thawed shrimp in about an hour.  That really works well with my tendency to procrastinate.


You'll want to chop up your herbs and zest your lemon.  I used fresh dill, parsley, and oregano.


The topping for this is a wonderful mix of a small portion of these herbs, panko, a little bit of feta, and melted butter.


The cheese really makes this dish.  I recommend using real Greek feta, not that Athenos brand stuff you find already crumbled at the grocery store.  Buy the real deal located in the gourmet cheese section of your grocery store.  It will be a big block in brine, much like they sell fresh mozzarella.  I have even found some at Costco that is really good, too.  The grated cheese below is Gruyere.  Gruyere is probably my favorite cheese to use in any Mac and Cheese.  It is amazing and melts beautifully.


Like most mac and cheese's you begin by making a rue, then adding the cheese to make the cheese sauce.  I forgot to snap a pic of this process, but you'll see it together with the pasta soon enough. 

Take your hot cooked pasta and chopped up shrimp and toss together in a bowl with the white wine.  The heat of the pasta will partially cook the shrimp in just a few minutes.  Set this aside.


Once you've made your cheese sauce and added the herbs and lemon zest, throw the pasta and shrimp in and toss to combine.


Pour into a baking dish and top with your panko and herb topping.


Bake for about 25 minutes and you are done!  So easy and so good.  Serve with a green salad and some crusty bread to soak up any cheese sauce that might be left on your plate.


Shrimp and Feta Mac and Cheese
Adapted from Pink Parsley

1 pound pasta, I love Cellentani for all my mac and cheese's.
1 pound raw shrimp, thawed, peeled and deveined, tails removed, and cut into thirds
1/3 cup dry white wine (I used Pinot Grigio, but Sauvignon Blanc is great, too)
12 oz. feta, cubed
zest of 1 lemon, divided
1/2 cup panko bread crumbs
3TBSP chopped fresh parsley, divided
5 TBSP butter
4 TBSP all-purpose flour
3 cups whole milk
2 TBSP fresh dill, chopped
2 TBSP fresh oregano, chopped
1 pinch red pepper flakes
2 cups shredded Gruyere cheese
1/2 tsp kosher salt
1/2 tsp fresh ground black pepper

Preheat oven to 400 degrees.

First, bring a large pot of salted water to a boil and then add your pasta and cook until just short of al dente(about 8 minutes).  Drain and toss with shrimp and white wine in a large bowl.  Set aside.

In a small bowl, combine a small handful of the feta, the panko, a pinch of lemon zest, 2 tsp of the parsley and 1 TBSP of melted butter.  Mix with a fork and set aside.

In a large saucepan over medium heat, melt the remaining butter.  Add the flour and whisk constantly until a light golden brown paste(rue) is formed.  Whisk in the milk and stir frequently until slightly thickened, about 5-7 minutes.

Remove from heat and stir in the feta, gruyere, oregano, parsley, dill, red pepper flakes, the remaining lemon zest, and salt and pepper.  Stir to melt the cheese and then pour your pasta and shrimp mixture into the pot.  Stir to combine.

Pour pasta into a buttered baking dish and sprinkle the top with the panko mixture.  Bake for 20-25 minutes until lightly browned and bubbly.  Remove from oven and let cool slightly before serving so the cheese sauce does not run all over your plate.

Enjoy!


Wednesday, June 23, 2010

The Best Pasta Salad!

Clearly this is not the name that The Barefoot Contessa gives this recipe, but I happen to believe it is the best one I have ever had so I am going to go ahead and re-name it for her.  I LOVE the Barefoot Contessa and if I ever start posting recipes regularly again, you will most definitely see a trend in them.  I'd say half of everything I make comes from her in some shape or form.  I don't always follow them to a "T" and sometimes I will seek out other sources for a recipe, but she really is my go-to gal when it comes to food.  Especially when it comes to entertaining.  I love her simple style.  Ok, enough about my love affair with all that is Ina, let's get onto this pasta salad. 

Surely we all will get invited to at least a few BBQ's over the next few summer months and if you should ever wonder what to bring, just bring this.  Your friends will thank you!

Here is what you will need for the pasta salad:


Start by boiling the pasta, of course, but then you'll want to start on the sauce.  That is what makes this recipe so much different than the rest.  Usually you just throw in some oil, vinegar, salt and pepper and call it a day...not anymore!


Put your EVOO, red wine vinegar, salt, pepper, capers, garlic, and sun-dried tomatoes into the bowl of your food processor and pulse until it looks like this:


This is pure delicious-ness!

Next, chop up your tomatoes, olives, and fresh mozzarella into chunks:


Once pasta is cooked and drained, throw everything together in a bowl and add some chopped sun dried tomatoes.

Then, add the sauce:

And the fresh basil:

Now you have the most delicious pasta salad!  And it was pretty darn easy, too!  Just another of the many reasons I love The Barefoot Contessa!


Pasta with Sun-Dried Tomatoes(aka The Best Pasta Salad)
Adapted from Ina Garten, The Barefoot Contessa

Serves 6 to 8

1/2 pound fusilli pasta
kosher salt
Olive Oil
1 lb ripe cherry tomatoes, halved
1/2 cup kalamata olives, pitted and diced
1 lb fresh mozzarella, cut into chunks
6 sun dried tomatoes in oil, drained and chopped

For the dressing:

5 sun dried tomatoes in oil, drained
2 TBSP red wine vinegar
6 TBSP evoo
1 garlic clove
1 teaspoon capers, drained
1-2 teaspoons kosher salt(adjust to taste)
3/4 tsp freshly ground black pepper

1 cup parmesan cheese, freshly grated
1 cup packed basil leaves, julienned

Cook the pasta in a large pot of boiling salted water until al dente.  Drain well and allow to cool.  Place the pasta in a large bowl and add the tomatoes, olives, mozzarella, and chopped sun dried tomatoes.

For the dressing, combine all the ingredients in a food processor until almost smooth.

Pour the dressing over the pasta, sprinkle with parmesan cheese and basil, and toss well.

Enjoy!
~Sara

Tuesday, March 30, 2010

Sour Cream Coffee Cake

Believe it or not, this Sour Cream Coffee Cake is actually a **lighter** version.  I found this in last months Cooking Light magazine, realized I had all the ingredients, and set out to make it as soon as I could.  I love coffee cake and I especially love anything sweet in the morning.  Makes that cup(or in my case 2, or 3...) of coffee so much more enjoyable!

This is what you will need for this recipe:

Oh, and this, too!


Start by creaming together the butter and the sugars:


Something a little different about this recipe...you toast the oats.  YUM!


Also, another difference is that you actually grind a portion of the oats and mix into the flour mixture.  Don't grind all the oats, though.  Reserve the rest for the topping!


Whisk together your dry ingredients:


Mmm...sour cream.  If you don't already bake with this stuff, you really should start now.  I make almost every cupcake of mine with sour cream. 


The batter...


Pour into a springform pan:


And my favorite part:  the topping!


Start by chopping up some walnuts


Put them on a baking sheet and toast for about 8 minutes


Combine the walnuts with butter, oats, and brown sugar.  I used a pastry blender.


When it looks like this, it is ready to go on top of the cake


And when it is all done:


YUM!!


I couldn't wait to dig in the next morning...


Sour Cream Coffee Cake
Adapted from Cooking Light

3/4 Cup old fashioned oats, divided
cooking spray
1 cup all purpose flour
1/4 cup whole wheat flour
1 tsp baking powder
1/2 tsp baking soda
1/4 tsp salt
1/2 cup granulated sugar
1/2 cup packed brown sugar, divided
1/3 cup butter, room temperature
2 extra large eggs, room temperature
1 tsp vanilla extract
1 cup light sour cream
2 TBSP finely chopped walnuts, toasted(in a 400 degree oven for about 8 minutes)
1/2 tsp ground cinnamon
1 TBSP chilled butter, cut into small pieces

Preheat oven to 350 degrees.

Spread oats in a single layer on a baking sheet.  Bake at 350 for 6 minutes or until lightly golden.

Coat a 9 inch springform pan with cooking spray; set aside.

Reserve 1/4 cup of the toasted oats and set aside.  Place remaining oats in the food processor, process until finely ground.  Combine the oats with the flours, baking soda, and salt.  Stir with a whisk.

Place granulated sugar, 1/4 cup of the brown sugar, and 1/3 cup butter in a large bowl.  Beat with a mixer at medium speed for 3 minutes or until light and fluffy.  Add eggs, 1 at a time, beating well after each addition.  Beat in vanilla.  Add flour mixture to sugar mixture altearnately with the sour cream, beginning and ending with the dry mixture.  Spoon batter into prepared pan; spread evenly.

Combine remaining 1/4 cup oats, remaining 1/4 cup brown sugar, nuts and cinnamon in a bowl.  Cut in 1 TBSP butter with a pastry blender until combined.  Sprinkle top of batter with the nut mixture and bake at 350 for 35-38 minutes, or until toothpick inserted in center comes clean.

Cool cake in pan for about 10 minutes; remove from pan.

This serves about 10 and each slice contains less than 300 calories!

Enjoy!


Wednesday, March 3, 2010

Whole Wheat Spaghetti with Lemon, Basil, and Salmon


I saw Giada make this on her Food Network show about 2 years ago and have been meaning to make it ever since.  My friend Heather actually beat me to it in her current quest to cook her way through Giada's cookbook this year.  She gave it great reviews so I knew it was finally time to make this dish!  And boy am I glad I did!  This is so light, healthy, and really very easy...not to mention delicious!  We are trying to eat more fish in our household(well, actually we're always trying to and then never quite get around to it) and having recipes like this one will certainly make it easier to accomplish that task. 

I am super tired tonight, and actually quite cranky, so I am going to skip all the usual photos and just go straight to the recipe this time.  In fact, I'm not even going to type up the recipe for you, instead I'll just leave you with the link:  http://www.foodnetwork.com/recipes/giada-de-laurentiis/whole-wheat-spaghetti-with-lemon-basil-and-salmon-recipe/index.html

I promise to be back to my usual photo taking and talkative self next time around.  I will leave you with one last photo since I am quite pleased with the way they turned out(got my new Nikon, can you tell?).  Do try this recipe out if you are the salmon liking kind, though, it is REALLY good!

Tuesday, February 23, 2010

My Favorite Sandwich


This sandwich has given new meaning to "sandwiches for dinner" in our house.  My mom introduced this sandwich to me(thanks, mom) and now it works its way onto our table about once a month.  This can be a meal in itself, but you might be left a little hungry, so I usually serve it with my Butternut Squash Soup or Minestrone(this recipe is coming next week!!).
Sandwiches are always simple, but this one has a couple "gourmet" ingredients that really take it to a whole other level.  If you know me very well at all you know I love brie cheese.  I mean, I really love it.  If I could only live on one thing for the rest of my life it would be brie.  And maybe a good baguette.  Ok, and some wine.  Really, though, brie is my all time favorite food.  So, brie in a sandwich, slightly melted and oozing a tad-bit is pure heaven!!
My mom said she discovered this recipe on foodnetwork.com and is a Tyler Florence recipe.  I've yet to actually look up the recipe so I have no idea how much of what he calls for, but you really can't mess up a sandwich so I just use what looks good to me!

These are the ingredients you'll need for this recipe:


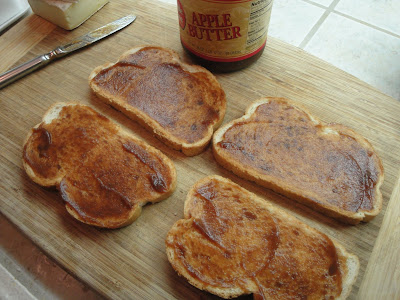
Start by spreading some apple butter on your bread.  You'll want it on both sides, but you can use as much or as little as you like.  The more you spread on, the sweeter it will be. 


Brie cheese.  I could just eat it like this and be happy. 


But I shall resist the temptation and practice some patience.  It will be even better when the sandwich is done, which is only in like, 5 minutes.   Arrange your sliced brie on one slice of bread for each sandwich.


Next up, turkey.  I like to use thinly sliced and only about 3 pieces.  Just a little hint of the turkey.  The star of the sandwich is the brie, after all, and I want it to really have its chance to shine!  You can use any kind of turkey you like.  I think my favorite is honey roasted.


Next up, arugula.  I don't think any substitutions should be made.  Arugula is peppery and bitter and goes quite nicely with the apple butter.


Make sure your arugula makes its way to the middle of your sandwich.  You don't want it to be touching the bread as you want it as far away from the heat source as possible.  There is nothing worse than soggy warm greens in your sandwich.


Butter both sides of the bread.  The more butter, the better.  Isn't this always the case?!?  I try to practice a little restraint, though, and use a somewhat moderate amount.


Grill until golden on both sides.  If you can remember, place the sandwich brie side down first.  It always takes a little longer for the first side to grill and the more time you have with the brie close to the heat source, the better.  The more meltier and oozier.  **I did NOT remember to do that this time**


Yum.  I might have to make this for lunch today..


Grilled Turkey and Brie Sanwiches
Adapted from Tyler Florence

Yield: 2 sandwiches

4 slices sliced french sandwich bread(do not use sourdough, it will overpower the flavors of the sandwich)
1 wedge brie cheese, any kind you like
6 slices thinly sliced turkey
apple butter
arugula
butter

Spread apple butter on the insides of both pieces of bread, for each sandwich.

Place sliced brie on one side of bread.  Place turkey slices on the other.  Top the brie cheese with a small handful of arugula and then put the sandwich together. 

Butter the outsides of both pieces of bread and grill until golden on both sides.  Serve warm.

Enjoy!!